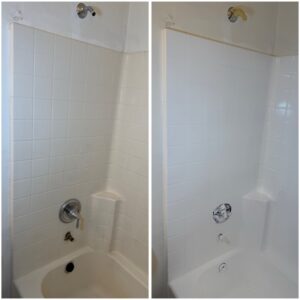
Looking for bathtub reglazing in Indian Wells? Adamov Reglazing restores fiberglass, acrylic, porcelain, and cast iron tubs across Indian Wells and the Coachella Valley — ready to use in about 7 hours, backed by a 4-year warranty, with no hidden costs. Reglazing instead of replacing saves thousands of dollars and days of demolition mess.
Indian Wells is largely country club and resort-area properties, many of them second homes that sit empty for part of the year. Fiberglass and acrylic enclosures are common here, and between the valley’s hard water and years of use they fade, dull, and chip long before anything structural fails. Reglazing avoids what a remodel means in a community like this — HOA approvals, weeks of trades coming and going, and a bathroom out of service through the season.
We handle:
Just finished up a fiberglass enclosure reglazing job out in Indian Wells, and it’s the kind of project that shows what this work can actually do for a tired old shower. Fiberglass takes a beating over the years. It fades, it dulls, it picks up chips, and once it cracks, water starts finding its way in. This one had been through it, but nothing we couldn’t bring back.
Like always, we started by pulling the fixtures off. The showerhead, the handles, the trim — everything comes off before we touch the surface. It’s not a step you can skip if you want a clean result. Working around fixtures leaves you with gaps and awkward edges, and the coating never lays down right. With everything off the wall, we had a clean, open surface to work with from top to bottom.
Then came the deep cleaning, which on any fiberglass enclosure job is where most of the real work happens. Years of soap scum, hard water, body oil, all of it has to come off completely. Fiberglass is smooth, and that’s part of the problem — a coating won’t grab onto a slick, dirty surface. So we scrubbed the whole thing down until it was clean and ready to take a finish. People always think the spraying is the main event, but the prep is what makes a job last.
This enclosure had a couple of chips and one decent-sized hole punched through the side. That’s the kind of damage you can’t just coat over and hope for the best. So we repaired the chips, filled and rebuilt the hole, and sanded everything back down flush so the surface was solid and level again. By the time we were done, you couldn’t tell where the damage had been. That matters on fiberglass — a hole left unrepaired only spreads, and coated over without a proper fix, it comes back.
With the repairs done, we masked off the entire room. Walls, floor, ceiling, anything outside the shower got taped and covered, because reglazing throws a fine overspray that drifts and settles on every surface it can reach. Then we set up ventilation to pull the fumes and overspray out of the space and keep the air moving while we worked.
Once the room was sealed and the air was moving, we sprayed an adhesive primer over the whole surface — that’s the bonding layer that lets the topcoat grip a slick material like fiberglass — and then laid down the bright white finish. The whole tub and shower combination went from a faded, chipped, beat-up enclosure to a smooth, glossy, bright white surface that looked brand new. The customer could hardly believe it was the same shower they’d been looking at for years.
We bring everything with us, so there’s very little you need to do. Still, a few things make the day go smoothly:
Clear the bathroom. Take out towels, bath mats, toiletries, anything on the counter or in the shower. We mask what stays, but an empty room is faster to seal off and better protected.
Let us know about the fixtures. We remove the showerhead, handles, and trim as part of the job. If you’re planning to replace them, say so when you book — see below on timing.
Plan around the window. The bathroom is out of use for the day, and the finish needs about seven hours to cure. If it’s your only bathroom, we’ll schedule so that’s as painless as possible.
Ventilation access. We run an exhaust setup out a window where possible. Just let us know if the bathroom has no window so we can plan the airflow.
Pets and household. Our equipment is loud for stretches and the coating has a strong smell during application. Pets are usually happier in another part of the house or out for the day. If anyone in the home has asthma or other sensitivity, tell us and we’ll talk through timing.
Access details for gated communities and second homes. Gate codes, guard clearance, or a property manager’s contact — send those ahead so nothing holds up the start. If the house is unoccupied, we’re comfortable working with your manager or caretaker to coordinate access.
This comes up constantly, and doing it backwards costs people money.
Booked that way, a reglaze plus new fixtures reads like a full remodel for a small fraction of the cost.
Every job finishes the same way: we hand over a post-care kit and our cleaning recommendations, so you know exactly how to keep the finish looking sharp.
This job was in Indian Wells, and we cover the neighboring Coachella Valley cities just as easily — Palm Desert, La Quinta, Rancho Mirage, Indio, and Bermuda Dunes.
Chips, holes, fading, the wrong color — whatever shape your fiberglass is in, reglazing brings it back for a fraction of what replacement costs. Call (310) 401-4491 for an honest estimate, and we’ll always tell you straight whether it’s worth doing.
For more information you check out our Blog or FAQ.