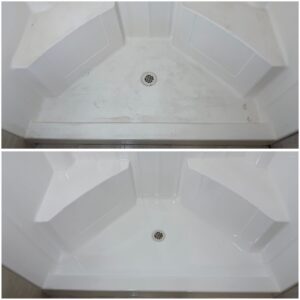
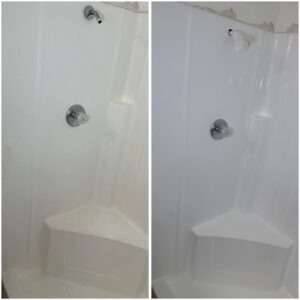
Just finished up another shower stall reglazing job in Anaheim and figured this one was worth writing about, because it covered most of the issues we run into out in the field. The customer had a fiberglass shower stall that someone — probably a previous owner — had already painted at some point. By the time it got to us it was pretty rough. The old coating was scratched up across most of the surface, and there were a handful of holes left over from where a shower frame had been mounted and then taken off. On top of that, there was a crack running across the floor of the stall.
A lot of people see a shower in this kind of shape and assume it’s a tear-out job. It’s not. As long as the stall is structurally sound, we can bring it back. Here’s exactly how this one went.
You can’t lay a fresh finish over a bad one. Whoever painted this stall before us didn’t prep it properly, which is usually why these DIY paint jobs start peeling and scratching within a year. The first thing we did was sand the entire surface down to knock that old coating off and get back to a smooth, even base. This also gives the new finish something to bite into later on.
Once the sanding is done, the whole stall gets a deep cleaning. Soap scum, body oils, leftover residue from the old coating, dust from the sanding — all of it has to come off. Any contamination left on the surface will cause the new coating to fail, so we don’t cut corners on this part. The surface needs to be completely clean and dry before we move on.
After cleaning, we re-caulked around the shower stall to make sure everything is properly sealed. Old caulk gets brittle and pulls away from the surface over time, and that’s how water starts working its way behind the stall. Replacing it now, before the new finish goes on, means the customer doesn’t have to worry about leaks down the road.
This is where each job is a little different. We filled in all the screw holes that were left from the old shower frame so they’d disappear under the final coat. The crack on the floor took a little more attention. Normally when we deal with cracks in a shower floor, we have to spray foam underneath for structural support, because a soft floor will keep flexing and crack the new finish all over again. In this case, when we tested the floor it was solid — the crack was cosmetic, not structural — so we skipped the foam and went straight to filling and smoothing the crack itself. Saved the customer some time and some money.
Before any spraying happens, the whole bathroom gets masked off. Walls, floor, fixtures, mirrors, hardware — everything that isn’t the shower stall gets covered. Overspray is fine particles of coating that travel through the air, and if you don’t mask properly, you end up with a haze on every surface in the room. This step takes a while, but it’s the difference between a clean job and a mess the homeowner has to deal with after we leave.
With everything prepped and protected, we sprayed an epoxy primer over the entire stall. The primer is what bonds the system to the fiberglass underneath. Without a proper primer coat, you’re basically setting the whole job up to fail.
After the primer set, we came back with several coats of commercial-grade polyurethane glaze. This is the actual finish coat — it’s what gives the shower its smooth, glossy look and stands up to daily use, hot water, and cleaning products. Multiple coats build up the depth and durability you want out of a refinish.
After the final coat cured and we pulled all the masking down, the customer had what was basically a brand-new looking shower stall — no scratches, no holes, no visible crack, and a clean glossy finish from top to bottom. All without ripping out the old stall, redoing the plumbing, or eating the cost of a full replacement.
If your shower stall is scratched up, has old hardware holes, or is looking dingy and dated, refinishing is almost always going to be the smarter call. Reach out and we’ll take a look at what you’ve got.
For more information you check out our Blog or FAQ.